|
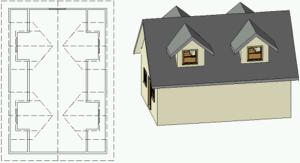
Adding Dormers to your Attic Space |
|
|
|
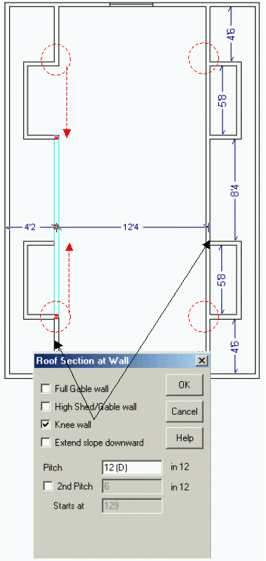
Starting with the 2nd floor from our Attic Room exercise,
change the two vertical inner walls to knee walls. Select the Roof tool
bar and the Roof Section at Wall tool. Double-Click one of the two
inner vertical walls. The Roof Section at Wall dialog box should
open. Check Knee Wall and click OK. Do the same with the
other inner vertical wall.
Next, add small rooms offset from the main room as shown on the right side of the example. (5'8" x 2'6") These will be where the Dormers will be so I will reference them as Dormers. Now select the Wall tool bar and the Break Wall tool. Place wall breaks at the intersections of the walls shown by the red dotted circles. Select the left inner vertical wall (center section) and drag the upper handle down to open the new dormer up to join with the main room. (as shown in example by the upper red arrow) The lower wall section shows the same, but before the wall resizing has been completed. (lower red arrow) Do the same for the two sections on the right side next. You should eventually end up with one large main room that includes the dormers. Make sure that the space between the vertical dormer walls and the outside walls are about 1'8". |
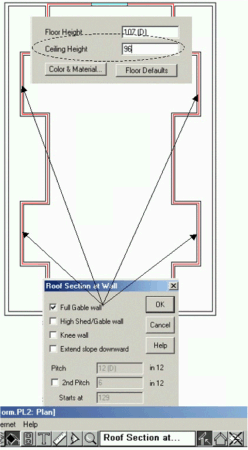
| Now select the main room by Double-Clicking the room. The
Room Specification dialog box should open. You will want to change
the Ceiling Height for the main room to 96". (standard) I
have shown only that section of the Room Specification dialog box in
this example. (upper box) This is important because you now want
the 8' ceiling height to extend out into the dormer area. This
should not alter the way the roof is drawn because the attic spaces
flanking the main room still have a ceiling height of 16", which is
what determines the height of the walls Top Plate.
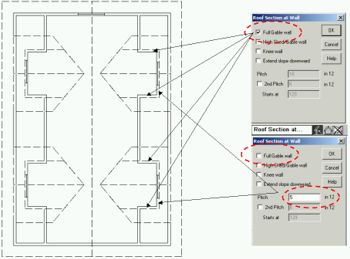
Now we plan to make the end walls of each dormer a Gable wall. To do that we will select the Roof tool bar and the Roof Section at Wall tool. (default) Single-Click the outer wall of one of the dormers. The Roof Section at Wall dialog box will open as shown. Check the Full Gable Wall checkbox. Click OK. Now do the same for the other three dormers. |
|
|
|
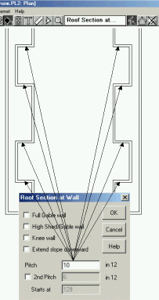
Now we need to change the slope of the roof sections that
make up the dormer roofs. The example to the left shows which
walls are affected. Select the Roof tool bar and the Roof Section
at Wall tool as shown at the top of the example. Click one of the short,
horizontal dormer walls and the Roof Section at Wall dialog box will
open. Change the Pitch from 12 in 12 to 10 in 12. Click OK. Do the
same for the other seven short walls of the dormers.
We are changing the pitch of these roofs to make certain that the ridge of the dormers do not extend above the main roof. |
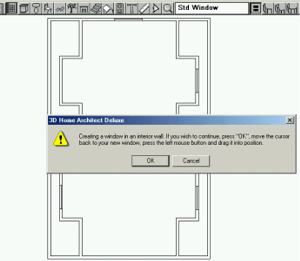
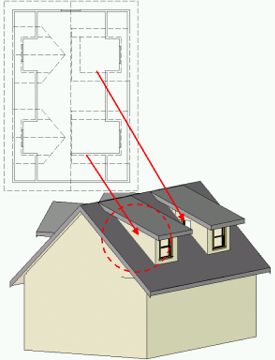
| How about adding some windows to our room. We will be placing one window in each of our new dormers. You can see by the example that follows that we are adding the new windows to the gable end wall of the dormers. Select the Window toolbar and the Default Window tool. Click in the center of the gable wall of one of the dormers. A Warning Dialog Box will display informing you that you are about to add a window to an inside wall. That's ok, so click OK. Now add windows to the other three dormers. |
|
|
|
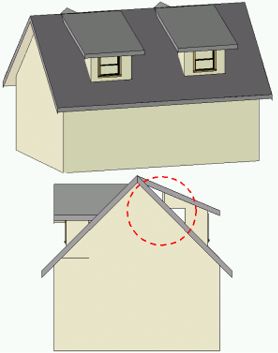
Finally, select the Roof tool bar and the Build Roof tool.
In the Build Roof dialog box, click OK. The roof will build and
you should see the dotted outline of the roof as shown in the
example.
View the house using the Full Overview. Turn the model to see the Windows better. You may have to raise the windows a bit to clear the roof section. |
|
Shed Dormers If you would like to see the dormers turned into Shed Dormers, read on. While they may not turn out perfect, they can be used to show certain views. So look at the picture below to see if you want to continue making this change..... Go back to Plan View, select the Roof toolbar and the Roof Section at Wall tool. Click on a Dormer side wall and check the Full Gable Wall checkbox. Click OK. Do the same for the other Dormer side walls. Using the same tool, click on a Dormer end wall and un-check the Full Gable Wall checkbox. Change Pitch to 5 in 12. (or less) Click OK. Do the same for each of the other Dormer end walls. Now re-build your roof and view the results in Full Overview. |
|
|
|
The top picture looks great! But when you view this model from the side you realize that parts of the dormer walls are missing. If this is OK with you, then you can have Shed Roof Dormers. |
|
This 3D view can be fixed by extending the Dormer side walls further into the
room (to end of shed roof), but that would ruin the Plan View and 3D
Views inside. If you need a Cross Section or Full Overview, then adjust
the walls in Plan View to capture your Cross Section/Full Overview, take
the snapshots from outside the model, then put the walls back the way they were.
If I come up with a better way to get this right every time, I'll post it. But for now, this is the best we can do. This problem is a bit like the lost wall over a Shed Roof porch against a Hip roof wall.
|
|