|
SPLIT LEVEL
DESIGNS |
Building a split level home is actually quite easy as long
as you follow this simple rule. You want to make sure you
build your Stairwell(s) inside the footprint of the level that is highest in elevation. If
you have 3 levels and 2 different stairwells, then each stairwell should
follow this same rule. If level 1 is the lowest and level 3 is the
highest, then the stairwell between levels 1 & 2 should be
incorporated in the area of level 2. Between levels 2 & 3, the
stairwell should be in level 3s footprint. |
| Start this lesson by constructing a building approximately 30' x
60'. Then insert a wall, splitting the building in two. Now draw
walls in the right side room, creating a stairwell about 5' wide and 12'
long. Next double click the room on the right and it's Room Specification
dialog box will open. Completely replace the 0 (D) in the Floor
Height text box and replace it with 48. Click in the Ceiling Height and it
will turn to 48 (D). Change that value to 96. Click OK. That
should make the room on the right the "Highest in Elevation" and why we placed
the stairwell withing its footprint. The
room on the left should remain as is, but the stairwell needs to
change. Double click the stairwell and change the Ceiling Height to
144 (48" + 96") in the Room Spec dialog box. Leave the floor at
0 (D). Click OK. The stairwell now has a floor height as low as the lowest
floor (0) and a ceiling height as high as the highest ceiling (144). |

|
|

|
Now let's insert some stairs. Click on the Stair Tool and
build the stairs by taking the cursor and placing it about 1/3 way down
from the top of the stairwell and dragging the cursor toward the bottom of
the stairwell. This photo shows about 9 Treads. That will be too many, so
double click the stairs to open its dialog box. Change Treads to 6
and click OK. Next, add a doorway at the top and bottom of the
stairs, as shown in the previous picture, using the Door tool in the Door
toolbar. |
|
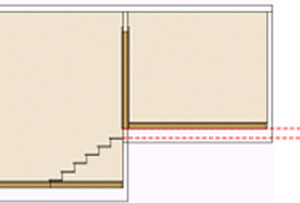
Now view the stairs by clicking the View Toolbar and the
Cross Section tool. Drag the cursor from left to right inside the
stairwell as shown in the next picture. The picture below
should be similar to what you see. |

|
|
|
Notice the distance between the top step and the next
floor indicated by the dotted red lines. It is about the same as 1
step. That should make the right transition between stairs and the
upper split floor. You could have added a 7th step.
Now return to plan view by closing this 3D view. We need
to adjust the position of the stairs as well as tighten up the stairwell. |
| 1st, move the stairs closer to the doorway in the lower
floor (left side) shown in the next picture, 1st diagram. 2nd, reduce the
size of the upper floor door. 3rd, move the lower stairwell wall upward to
touch the stairs. 4th, Select the doorway that is obviously too
small and widen it as shown in the 4th & 5th diagrams in the picture
to the right. |

|
|
|
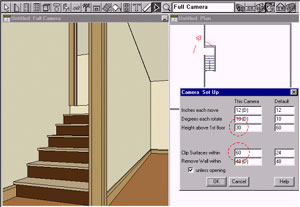
Now view the stairs by selecting the view toolbar and the
Full Camera tool. The small red camera in the plan view side of the picture to the left shows the
direction of the view.(from the lower floor, north of the stairwell, pointing toward the
stairs) From the Main Menu, select Window-> Tile and you should have
two views open (3D and Plan). Double click the red camera in the plan view
and the Camera Set Up dialog box will open. Change Height above 1st floor
to 30 and Clip Surfaces within to 60. Your view may look like the
picture to the left. If not, then click on the 3D view and use the camera
movement tools to achieve this look. From this picture, you can see
that the stairs correctly connect the lower and upper split floors. |
| If you view your model in Full Overhead view it would look
like the following picture. The split level design is evident.
But go ahead and add windows, doors, and two gable roofs to the
model. My model turned out like the picture below. Notice how the
stair well projects below the rest of the upper split level. This is
because we set the floor level of the stairwell to be the same as the floor level
of the lower floor and the ceiling height to be as high as the upper floor.
If we wanted to add a standard 3rd level, it would obviously be placed above the 1st level
on the left as a 2nd story. The only thing you would want to do would be to move the stairwell
from the right side to the left because that would be the area with the highest elevation.
|

|
