|
Opening Above Your Stairway |
The 3DHA manual talks about how to create an opening in an upper floor so that you can view the stairway that reaches the floor below. This is absolutely necessary if you want to get a realistic 3D view from the upper floor. But what the manual does not discuss is what you need to do in order to get a realistic view from the lower floor. This quick lesson will provide you with the necessary steps to complete a realistic stairway. |
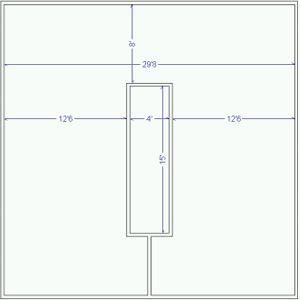
| Let's start out by creating a lower floor. Let's make it 30' wide by 30' deep. Now create a room in the center. This will be "kind of like" your Stairwell. Remember! - 3DHA will not recognize a stand alone room in the middle of your plan unless you connect it to an exterior wall with a wall. That wall can be invisible if you don't want it to show, but it must exist. I have included this wall vertically, extending from the lower inner wall to the lower outer wall. We are going to want to make all of these inner walls invisible for our demonstration. But for now, we will leave these walls visible. You will see why in a moment. We're ready to start a second floor so we need to save our model at this point. Save your plan. |
|
|
|
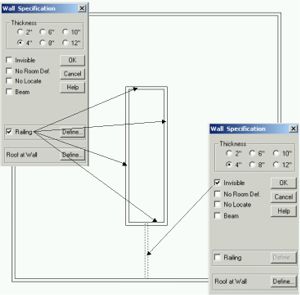
From the Main Menu, select Window->Show Floors and the Show Floors dialog box will open. Click on the Build Button under 2nd and the New Working Plan dialog box opens. Choose the option "Derive 2nd floor plan from the 1st floor plan" and click OK. Click OK on the Show Floor dialog box and the 2nd floor will be built and it will become the active plan. Notice that your stairwell does not show. We will want to build the exact same stairwell on the second floor. (Remember the connecting wall!) But to be sure we align the 2nd floor stairwell with the 1st floor, let's toggle on the 1st floor. From the Main Menu, select Window->Reference Toggle. Your 1st floor plan shows up as red lines. Notice that the inner walls appear. If we had made them invisible while we were working on the 1st floor they would not show up in this Reference Toggle at all. Draw walls over the inner walls from the 1st floor. You may have to zoom in on this area to adjust the walls to align. Once aligned, they should appear as light blue walls. You can now turn the 1st floor reference off. From the Main Menu, select Window->Reference Toggle. Next, set the properties of each of the inner walls. The 4 walls that make up the stairwell will be Railings and the connecting wall will be invisible. Double click an inner wall to open it's Wall Specification dialog box and Check the Railing checkbox. Click OK. Do the same for the other three inner walls. Now double click the connecting wall and check the Invisible checkbox. Click OK. |
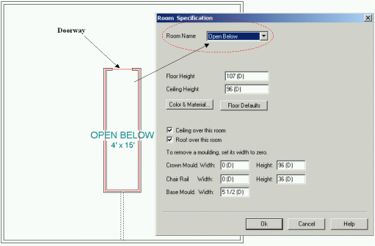
| Following the manual, we should make this stairwell area "Open Below". So let's do that. Double click the inner room and the Room Specification dialog box will open. Pull down the Room Name Combo box selection arrow and scroll down to the bottom and choose Open Below. Let's also place a doorway in the end railing. Select the Door tool bar and click on the wall/rail at the upper end of the stairwell. At this point, if you were to view this area in Full Camera view, you should notice an opening in the floor with a railing around it. But our mission was to build a stairway and make it possible to see up through the stairwell to the floor above. So let's switch the the lower floor to finish our task. |
|
|
|
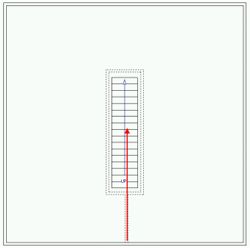
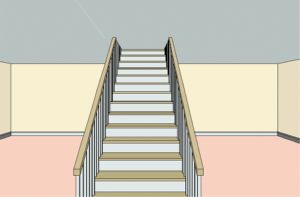
From the Main Menu, select Window->Swap-Ref to return to the 1st floor. Double click on one of the stairwell walls. The Wall Specification dialog box will open. Check Invisible and click OK. Do the same for the other 4 inner walls. (3 stairwell walls and 1 connecting) Now add the Stairs. Click the Stairway tool and drag a set of stairs from the lower end of the stairwell to the upper end. Leave a little room ("small area") between the stairs and the top wall. It should look something like the picture to the left. The up arrow shows the direction the stairs go from bottom to top. |
| Following the manual, we would be done. But let's take a look at our results and see if this is what we want. Select the View toolbar and the Full Camera View tool. Drag your cursor in the direction shown in the picture above. (from bottom to top) Your view should look something like the following picture. Notice the ceiling is stopping you from seeing up through your stairwell to the second floor. |
|
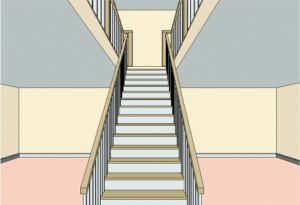
| This is where the "stairwell room" you built on the first floor comes into play. With the selection tool (arrow) active, double click the "small area" between the upper end of the stairs and the upper wall of the stairwell that we left in a previous step. The Room Specification dialog box should open. Remove the check mark in the "Ceiling over this room" checkbox and click OK. Now, create the same view as before. Your view should look something like the picture that follows. You can now see the second floor from the first. |
|