|
Create Your Own Backdrops |
In "Applied Material View" you have the ability to use a Bitmap image (picture) as the backdrop of your model. Using a bitmap image as a backdrop has very limited purpose because the same backdrop is used no matter what angle you are looking from. And the angle that the photo was taken from may not match the angle you are viewing your model from. To use one of those images as a background scene for your model in Applied Material View (AMV), go to the Main Menu and select 3D, then Set Up Applied Material View. The set-up dialog box will open. (below left) Click on the Backdrop button and the Set-up Backdrop dialog box opens. (below left) Click on the Select Image button and the Select Image dialog box opens. (below right) |
 |
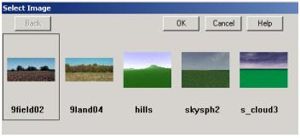 |
| This is where you can choose the backdrop you would like to see behind your model. But notice how 3DHA has only supplied 5 different backdrop images that you can use. What if you want to use a photo of the lot you intend to build on? You would like to see what your house is going to look like on that lot. This can be done, but you will need to 1) understand a little about how photos are displayed on computers and 2) you will also need to own some type of software that allows you to save graphic images as Bitmap files. (.bmp) Photographs, TV screens, and computer monitors all use pixels to create the picture you see. | Pixels are the thousands of tiny dots of color that, when crammed together, make up that picture. A picture is measured in the number of pixels wide by the number of pixels high. Without getting long winded about aspect ratios and such, 3DHA requires that the pictures you use as backdrops be created/edited in multiples of 64. That means that you must make sure that the photos you use must have both a height and width using one these numbers of pixels: 64, 128, 192, 256, 320, 384, 448, 512, 576, 640, 704, 768, etc, etc. For 3DHA purposes, I suggest you make your photo 512 pixels wide by 256 pixels high. Also start with a photo that has not been compressed previously. |
| The files that 3DHA provides have the following pixel
numbers (w=wide and h=high):
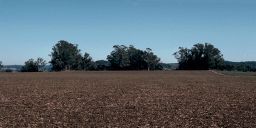
1) 9FIELD02.bmp = 512w x 256h The picture to the right is the 9FIELD02.bmp file. It has been reduced in size (to 1/2 size) so that it will fit nicely onto this web page. |
|
| So much for the first requirement about how photos are displayed on computers. The second requirement, owning software that allows you to create bitmap files, is a little tougher to cover. Since each person will own different software, there is no way to teach you how to accomplish this in a step by step tutorial. So I will try to cover the basic idea of what you will need to do. The rest will be up to you. Some software that allows you to accomplish the goal would be: Microsoft Photodraw, ULead Photo Impact, Adobe PhotoShop, and many others. | While Microsoft Paint will allow you to convert a .gif or a .jpg (typical photographic file) into a Bitmap (.bmp) file, it does not allow you to resize (or resample) your photo to be in multiples of 64. While it comes free with your Windows operating system, it is actually cheap. You need to be able to RESIZE and CROP a photo and it is almost necessary to be able to resize using pixels as the Unit of measure. |
| First, get an electronic version of your photo into your
computer. You can do this by either downloading the picture from your
digital camera directly into your hard drive, scanning an existing photo
by using a scanner (if you have one), or taking a photo down to a photo
processing center and pay them to create an electronic file for you.
Good software will read many different file formats such as .jpg, .gif,
.bmp, etc. Second, fire up your graphic software and open the
electronic file. Next, you will want to Crop the photo to include only
what you want to see. It would be best to make your picture twice as
wide as it is high. This is because your home is generally much wider
than it is high. Notice how 9FIELD02.bmp is 512 wide by 256 high. This
is where each software package uses different methods to perform the
Crop operation. Use the help facility of your software to see how to
crop a photo.
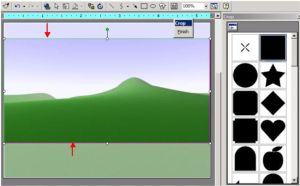
The following picture shows Microsoft PhotoDraw as the Cropping software. |
Microsoft PhotoDraw The Crop pallet on the right hand side allows you to choose the shape of the cropping tool. We will want to use the standard rectangle in the upper right. If you look closely at the picture on the left, you will notice the Cropping frame around the center of the picture (red arrows show top and bottom). PhotoDraw is no longer available from Microsoft. Both Adobe Photoshop and Ulead's PhotoImpact have Crop Tools that allow you to draw a rectangle around the picture you are cropping as a way of setting the crop outline. They just don't allow for as many cropping shapes as this one. But then we don't need unique shapes to crop a background photo. |
|
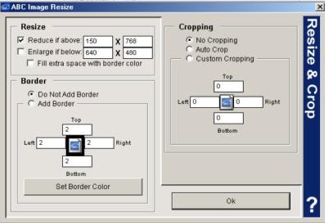
Compu-Pic-Pro This software uses one screen for both Cropping and Re-sizing. That may seem like an advantage, but it is really not the best way to perform these operations. A good Crop tool will allow you to draw a box around the picture to determine the crop area. Here, custom cropping is done by telling the program how much to crop off rather than how much to leave. Notice how the Re-size feature does not let you choose the exact number of pixels, but rather "Reduce if above" or "Enlarge if below" values. This may make it difficult, if not impossible to get an exact multiple of 64. |
Microsoft PowerPoint allows you to crop a Picture using a
Crop tool. You select the Picture, choose the crop tool from the picture
palette, and then pull the sides, top, and bottom inward to perform the
crop. This is a pretty good crop tool. But PowerPoint will be very
disappointing when it comes to re-sizing your photo. Cropping is only done to get the picture close to the shape you are looking for. But 3DHA needs to have the photo created in exact multiples of 64. To get this, you will probably need to re-size the photo. Again, for a 3DHA backdrop, I would recommend making your photo 512 pixels wide by 256 pixels high. As before, read the help facility of your Photo Editing software to see how to Re-size or Re-sample the photo. You will want to set the Unit of measure for this procedure to PIXELS. |
|
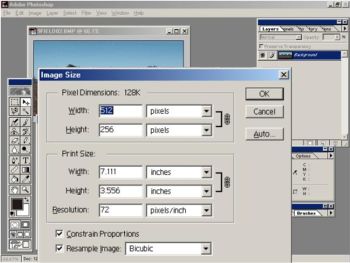
Adobe Photoshop Photoshop allows you to set the exact height and width (in pixels) of the final picture size. This is a high end graphics program and it costs a lot of money. ($300-$700) This is software the Professionals use. All graphic editing software will take some time to master, so prepare to learn or find someone else who can help you create your background. Maybe you have a friend that is already proficient at a graphic program. |
ULead PhotoImpact PhotoImpact lets you do the same as Photoshop. Along with setting the height and width, they also allow you to Constrain Proportions/Keep Aspect Ratio, which keeps the photo from looking distorted. If you're not a professional graphic artist, then my advice is to buy PhotoImpact due to it's much lower cost. ($89) You may even be able to find an older version on e-bay for about $10.00. Version 5.0 is being used here. This program is very powerful for the money. |
| Next, you will want to save your picture as a BITMAP file.
Again, read the help facility of your Photo Editing software to see how to
Save a Bitmap. But generally, most programs use the File->Save..As
menu item to let you save a picture as a file other than that which is
native to the program. For 3DHA to recognize this photo as a backdrop
file, you need to save it in the sub-directory named: BACKDROP It
can be found in the 3DHA3 (v3.0) directory. If you accepted all of
the default values when you loaded 3DHA v3.0, then the full directory
path is probably: C:\Program Files\3DHA3\BACKDROP If not, then you
will have to find this directory on your own.
Once you have saved a copy of the picture in a bitmap format, you may want to save another copy in the format native to the graphic program you are using. (Photoshop=.psd, PhotoDraw=.mix) This makes it easier to edit later. |
Now to use your backdrop. Open 3DHA and follow the
directions found at the beginning of this lesson. When you get to the
Select Image dialog box, you should see your photo included with the
others. If not, then the photo is either: 1) not in a multiple of 64 or
2) it is not in the BACKDROP directory. Check to see if it is in the
proper directory first. If so, then open your bitmap file in your editor
and check the size.
You may have to use the crop tool to adjust your photo size. When it is close to being in multiples of 64 in both directions, then you may have to re-size the photo with "Constrain Proportions" / "Keep aspect ration" unchecked. Your photo will not have the proper aspect ratio, but it should be close. These are advanced concepts, and thus difficult to teach in a quick lesson. So don't get too discouraged. Just work with cropping and re-sizing in the graphics software and you will eventually get better at it. |
|
|
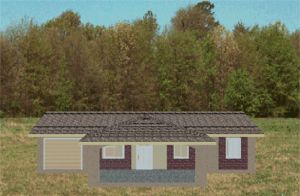
The photo to the left uses a very simple model on a standard 3DHA background (9LAND04.bmp) in "Applied Material View". It's not the best is the world and certainly not perfect, but it might give you a better feel for your model on a particular piece of property. |