|
MODIFYING YOUR CABINETS Making modifications to a cabinet is quite easy in 3DHA. The Cabinet Specification dialog box makes it possible for you to create most standard designs. To start this lesson, you will need a cabinet to modify. So click on the Cabinet Toolbar and the Full Height Cabinet tool. Click somewhere in the workspace to create a cabinet. To open its dialog box, double click the cabinet. Each cabinet is made up of 1 or more Sections, stacked on top of one another. These sections are referred to as Items in the dialog box. Each Item has a Type property and a Height property. When modifying a cabinet you will be working these Items from the top of the cabinet down. It is possible to Add New Items to a cabinet above existing Items, but 3DHA generally works the process from top to bottom, creating new available spaces below all other Items when space permits. |
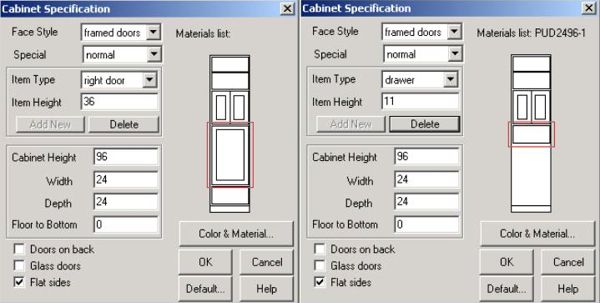
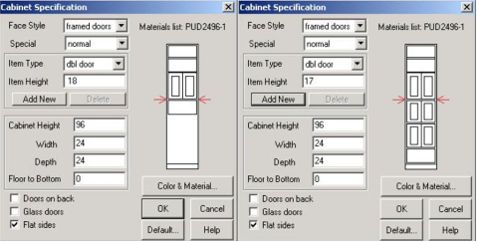
| The first example (left) shows the dialog box for a Full Height Cabinet that has been modified to 96" high. So let's first change our default Cabinet's Height to 96 so that it reaches an 8' ceiling (and gives us more room to play). It starts out with two Items, both are Right Doors. The top one should be 40" high and the bottom one should be 49" high. We are going to change the top Item, so single click the top door in the diagram next to the red boxed 1. A red line will show up around the Item to show it is selected. You will also see the Item Type and Height will display their respective values. (right door, 40) Change the Item Type to shelves by clicking on the drop down arrow and selecting shelves. Change the Item Height to 20 by clicking in the text box and changing the value. As soon as you click into another text box (like width, depth, etc.), the upper cabinet door changes to shelves as shown in the dialog box to the right. Notice that the lower section changed in height to fill the cabinet. |
|
|
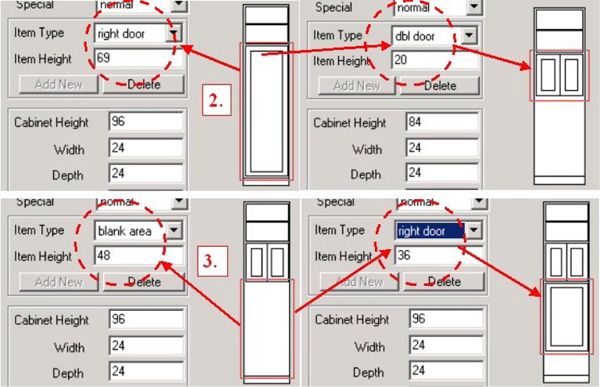
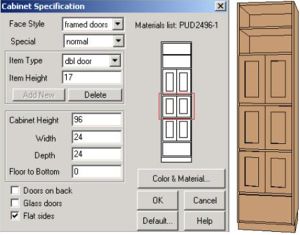
| Next, we will change the lower Item (door). [2.] Click on the lower door and the dialog box will show its values. Change this Item to a dbl door that is 20 inches high as shown in the upper left and right corners of the following example and move the cursor to another field. The example in the upper right shows the change. This time the area under the double doors remains blank. So let's make use of this space. [3.] Click on this area to select it and change the Item Type from "blank area" to "right door". Change the Height to 36 and move your cursor to an open field to commit the change. |
|
|
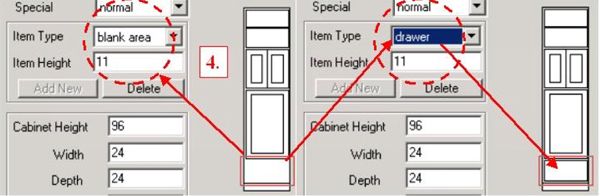
| Now, choose the last blank area and change it to a drawer. Since you want this last Item to take up the remaining space in the cabinet, leave the Item Height alone. Move the cursor to an open field and the drawer appears. |
|
|