|
Kitchen Cabinets |
Even thought the manual does an excellent job in covering the subject of cabinets, I thought I would include a tutorial that can show those who do not already own 3DHA just what it can do to help them design a kitchen. This lesson will NOT go through anything new or reveal any secrets that lay deep within 3DHA. |
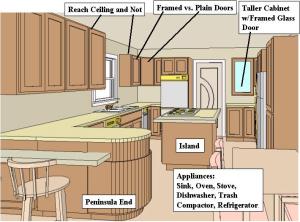
| You can see from the next picture that there are many things you can do to create a Custom Kitchen. The cabinet design feature of 3DHA allows you to use Framed Doors or Plain, with or without glass, place your upper cabinets up against the ceiling or leave a gap above them, add Islands, Peninsulas, appliances, and many more things to your kitchen. (or other rooms) You can also change the height and width of any cabinet. You can also choose flat sides, glass fronts, roll out shelves, and doors on the back of the cabinet. But that is another lesson on Cabinets only. |
|
|
|
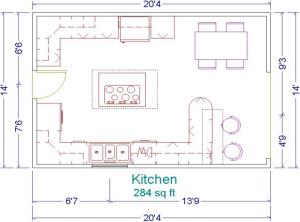
Let's start by building a room for our kitchen. Let's make it 20'4" wide by 14' deep. Add a door on the left, a doorway on the right, and a window in the lower wall. Use the previous drawing as a template for creating your room. Once you have followed this lesson, you will be prepared to create your own kitchen. Now let's get to adding the cabinets. The best way to build a model of a kitchen is just the opposite of building a real kitchen. When building a model, it is best to start by building the cabinets that sit on the ground and move to the upper cabinets after you have finished the lowers. |
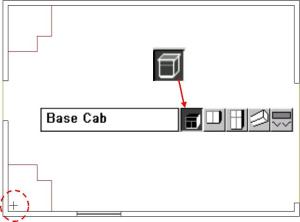
| In 3DHA it is best to build the corner cabinets first. So click on the Cabinet Tool on the main toolbar and then the Base Cabinet tool within the Cabinet toolbar. Place your cursor cross hairs close to the corner of the room (shown in red dashed circle in the lower left) and click. A corner cabinet should be placed in the corner as shown. If the cabinet is not a corner cabinet, but rather a regular one, then you did not place the cross hairs close enough to the corner before clicking and you will want to delete the regular cabinet and try again. If you did get a corner cabinet, then add another in the upper left corner of the kitchen as shown. |
|
|
|
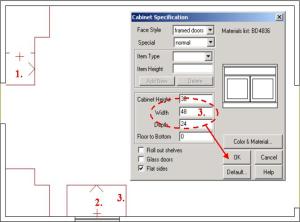
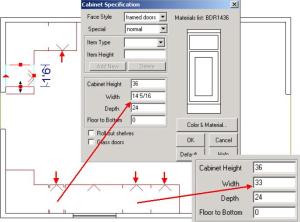
Now let's add some regular base cabinets. Since your Base Cabinet tool is still selected, all you have to do to add more base cabinets is to click where you want them. 1) Place a cabinet below the upper left corner cabinet by clicking below and near the corner cabinet. The new cabinet will attach to the corner cabinet and may extend over the door opening, But don't worry about that for now as we will fix it later. 2) Place one above the window in the lower wall. It will house the sink so we will need to make this cabinet bigger. 3) Double-Click this cabinet and it's dialog box will open. Change the Width to 48" and click OK. Now center the cabinet under the window. |
| Your Base Cabinet tool should still be selected. So add 4 more base cabinets shown by the short red arrows. Next, adjust the size of the cabinet below the upper left corner cabinet so that it does not extend over the door. Single click on it to select it and then drag the lower red handle up to the size required. I made mine 1'6" wide. If the short cabinet in the lower left area does not connect to the other two cabinets on either side, then double click it to open its dialog box and change its width until it does. Change the width of the cabinet to the right of the window cabinet to 33". It will be used to house the Dishwasher. |
|
|
|
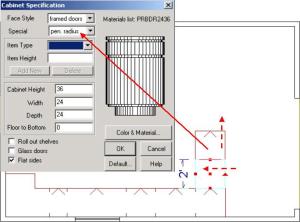
Now add 2 more Base Cabinets above the cabinet in the lower right. 1st add the one directly above. Select it by single clicking it. Grab the rotate handle (triangle at back) and rotate the cabinet to face the left. (now the triangle should be to the right) Next click above this cabinet and another will attach to it. Click this cabinet and rotate it so the front of the cabinet faces up. Now double click this cabinet to open its dialog box. Change it's Special drop down box to read "pen. radius" and click OK. The last cabinet changes to a peninsula. |
|
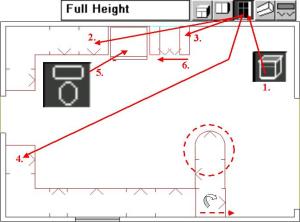
Notice how the peninsula gets rounded on the end. (red dashed circle) Now, let's make good use of the cabinet against the wall and below the peninsula by turning it to face the right. Click to select it, grab the rotation handle, and then turn the cabinet clockwise. Now you can store stuff in that cabinet because the door is accessible. It's time to add Full Sized Cabinets. 1) Click the Cabinet toolbar and the Full Height cabinet tool. Place Full Height cabinets as indicated by the next picture (2,3,4). Place cabinet #3 far enough away from cabinet #2 to ensure that a refrigerator will fit in between. 5) Add a refrigerator next to cabinet #2. Select the Fixtures tool (toilet), Appliances, Refrigerators, 30" Ref/Freezer, 30" L Ref/Freezer, and place on plan by clicking. 6) Move cabinet #3 next to the refrigerator by clicking it and then grabbing the center handle and dragging it into place. |
|
|
|
Add an Island by using a large Base Cabinet. Select the
Base Cabinet tool and click where you see the large cabinet in the
center of the room. Next, double click to open its dialog box. Re-size
it by changing the Width to 48" and the Depth to 36". Click OK
and you have an island.
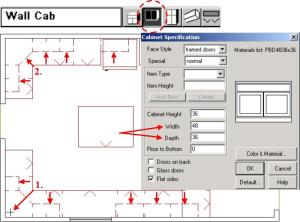
Now add the upper cabinets. Start with the corner cabinets. (just like the lowers) Click the Cabinet toolbar and the Wall Cabinet tool. Click near the two corners to place the corner cabinets. Then place cabinets as shown by the short red arrows in the picture to the left. |
| Your wall cabinet over the refrigerator does not extend across from the Full Height cabinet on the left to the one on the right. So click it to select it, grab the handle on the side that does not connect, and then drag that side until it connects to the opposite Full Height cabinet. In my case it turned out to be 2'9". Now let's add a larger top to the Island. We will use a soffit. Click the Cabinet toolbar and the Soffit tool. Click over the island to place the soffit. Double click the soffit to open its dialog box. Reset all the values to match as shown. Height: 2, Width: 72, Depth: 43, Floor to Bottom: 34. Now, using the same technique, place and resize another soffit as shown to create a bar/counter on the side of the peninsula. Height: 2, Width: 48, Depth: 13, Floor to Bottom: 28. |
|
|
|
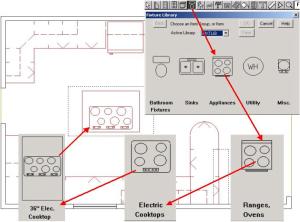
Now we'll place the appliances. Click the Fixtures tool (toilet), then click Appliances - Ranges, Ovens - Electric Cooktops - 36" Elec. Cooktop - OK. Place the cooktop into the center island by clicking on the island near the front of the cabinet (bottom). |
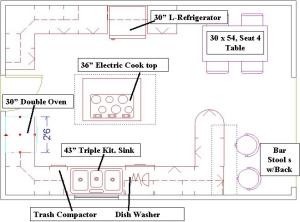
| Use the same method to place the rest of the appliances. Oven: Fixtures - Appliances - Ranges, Ovens - Ovens - 30" Double Oven - OK. Dishwasher: Fixtures - Appliances - Other - Kitchen - Dishwasher - OK. Trash Compactor: Fixtures - Appliances - Other - Kitchen - Trash Compactor - OK. Sink: Fixtures - Sinks - Kitchen Sinks - 43" Triple Kit. Sink - OK. Table: Furniture - Tables - Dining Tables - Rectangular Tables - Traditional - 30 x 54 Seat 4 - OK Bar Stools: Furniture - Misc. - Recreational - Bar - Bar Stool w/Back - OK You may want to open the dialog box for the bar stools and shorten them. |
|
|
|
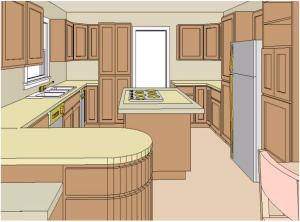
View your Kitchen by selecting the View toolbar from the main toolbar and the Full Camera tool. Click your cursor starting to the right of your kitchen and drag the cursor in the direction of the kitchen (left). Your Kitchen should look something like the preceding picture. |